
Table of Contents
- What Is Candle Tunneling and Why It Happens
- Method 1: The Aluminum Foil Technique
- Method 2: Using a Heat Gun to Melt the Wax
- Method 3: The Hair Dryer Approach
- Understanding the Candle Memory Ring and Proper Candle Burning Techniques
- How to Prevent Tunneling: The First Burn Matters Most
- How to Reuse Candle Jars After Tunneling
- Frequently Asked Questions
Last Updated: August 31, 2026
What Is Candle Tunneling and Why It Happens
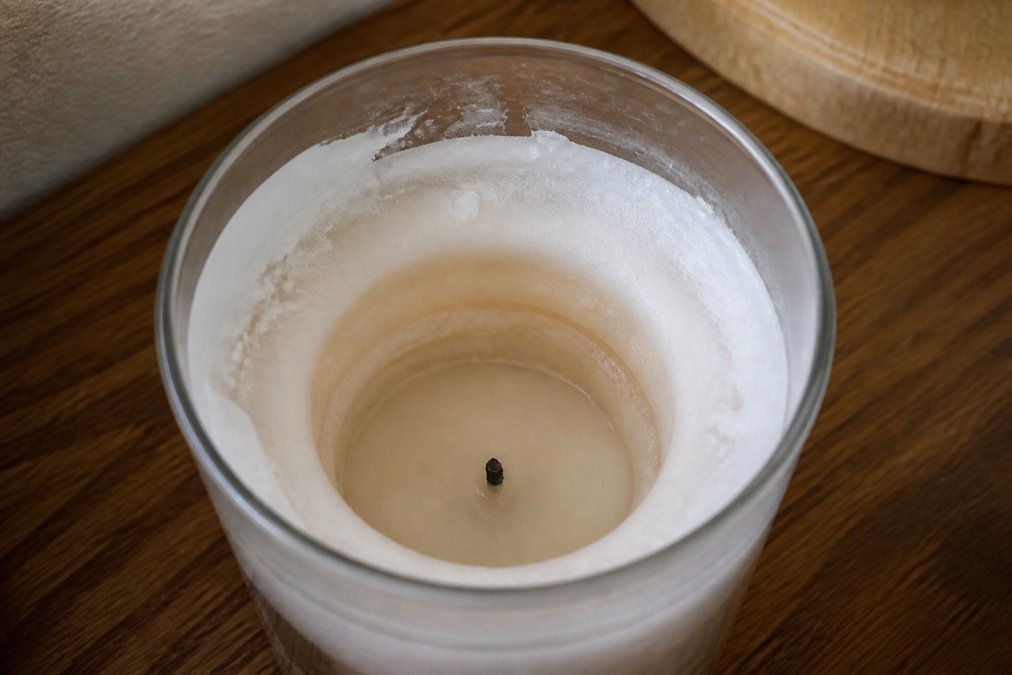
Candle tunneling occurs when the melt pool, the melted wax around the wick, fails to extend all the way to the edges of the jar during the burn. Instead, the flame burns straight down the center, leaving a tunnel of unmelted wax clinging to the sides. This wastes wax, shortens burn time, and leaves you frustrated with a candle that looks half-used after just a few burns.
The root cause is simple physics. Wax has memory. Once a candle cools after burning, it "remembers" that burn pattern. If the initial melt pool doesn't reach the jar's edges, subsequent burns will follow the same narrow path, deepening the tunnel with each use. The wick essentially carves a smaller and smaller channel, eventually becoming too short to function properly as it sinks deeper into the wax.
Common Causes of Candle Tunneling
Several factors contribute to tunneling, and understanding them helps you prevent the problem before it starts.
Wick size mismatch is the primary culprit. A wick that's too thin for the candle's diameter won't generate enough heat to melt wax all the way across. Conversely, a wick that's too thick will burn too hot and create other problems. The wick needs to match the jar's width precisely, this is why quality matters in hand-poured candles.
Drafts and air circulation accelerate tunneling. Moving air cools one side of the melt pool faster than others, causing uneven melting. Fans, open windows, and even HVAC vents can create invisible currents that push the flame to one side, leaving wax residue on the opposite wall.
Short initial burns lock in the problem before it starts. If you light a candle for only 30 minutes on the first burn, the melt pool won't reach the edges. The wax cools and sets that narrow pattern into memory. Every subsequent burn tries to follow that smaller path.
Paraffin wax and certain soy wax blends are more prone to tunneling than others. Some wax compositions have higher surface tension, meaning the melted wax doesn't flow as freely across the jar's bottom. Hand-poured candles from quality makers like Carbondale Candle use wax formulations specifically selected to prevent this issue.
Wick centering problems also play a role. If the wick drifts off-center during the pour, it won't heat the jar evenly. The flame will favor whichever side the wick leans toward, creating an asymmetrical melt pool that never reaches all edges.
Method 1: The Aluminum Foil Technique
The aluminum foil trick is the quickest fix for active tunneling, and it requires nothing you don't already have in your kitchen.
Light the candle and let it burn for 5-10 minutes until the wax begins to melt. Tear off a piece of aluminum foil roughly 3-4 inches wide and long enough to wrap around the jar's top edge. Fold it in half lengthwise to create a barrier, then position it so it reflects heat down onto the unmelted wax around the edges while leaving the wick exposed.
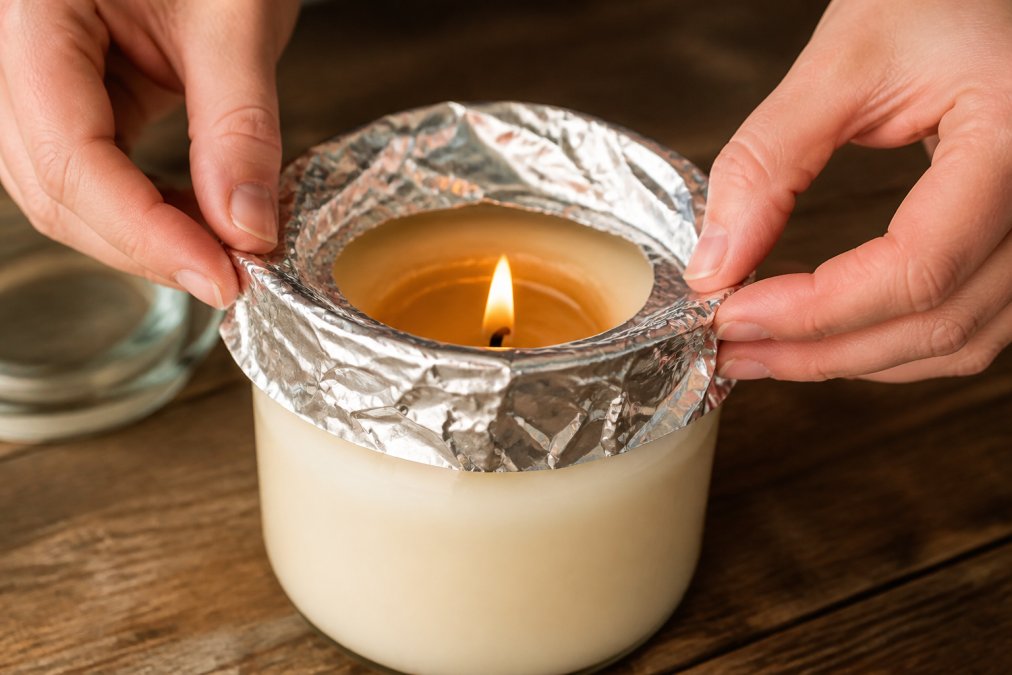
The foil acts as a heat reflector, concentrating warmth back onto the wax residue on the sides. This accelerates melting in those problem areas. Keep the foil in place for 15-20 minutes, checking progress every few minutes. You'll see the melt pool gradually expand toward the edges.
Important safety note: Never let the foil touch the flame directly. Position it so it redirects radiant heat only. If the foil gets too close to the wick, it can ignite. Watch the candle while using this method, don't leave it unattended.
The aluminum foil method works best for mild to moderate tunneling. For severe cases where the tunnel is very deep, you may need to repeat the process across multiple burn sessions. Once the melt pool finally reaches the edges, maintain proper burning practices going forward to prevent relapse.
Method 2: Using a Heat Gun to Melt the Wax
A heat gun offers faster, more controlled melting than the foil method, though it requires a tool you might not have on hand.
Set your heat gun to low or medium heat, high heat can damage the jar or cause the wax to bubble unevenly. Hold it 4-6 inches away from the jar's side and move it slowly across the unmelted wax in a sweeping motion (cpsc.gov). The goal is to warm the wax residue gradually, not blast it with intense heat.

Spend about 30-60 seconds on each problem area, watching the wax soften and flow. You'll notice the melt pool expanding as the wax liquefies. The heat gun method gives you precise control over where the heat goes, making it ideal for targeting specific tunneled sections.
Let the candle cool for a few minutes after heat-gun treatment. The wax will reset as it cools, ideally with a fuller, more even melt pool. If tunneling persists, repeat the process in subsequent burn sessions.
Safety consideration: Heat guns get extremely hot. Keep your hands and any flammable materials away from the nozzle. Never aim it at the wick or flame. Work in a well-ventilated space, as melting wax can release fumes. If you're uncomfortable using a heat gun near an open flame, stick with the aluminum foil method instead.
Method 3: The Hair Dryer Approach
A household hair dryer is the gentlest option for fixing tunneling, and it's safer than a heat gun because it operates at lower temperatures.
Light the candle and let it burn for 5-10 minutes. Set your hair dryer to low heat and hold it 8-12 inches away from the jar. Aim it at the unmelted wax on the sides, moving the dryer slowly back and forth to distribute warmth evenly. The warm air will gradually soften the wax residue without the intensity of a heat gun.
This method takes longer, usually 10-15 minutes of steady application, but it's forgiving. The lower heat means less risk of damaging the jar or creating uneven melting. It's also the safest option if you're concerned about fire hazard or have never used a heat gun before.
As with other methods, let the candle cool after treatment so the wax sets into its new, hopefully more even shape. The hair dryer works best for prevention and mild tunneling. For deep tunnels, combine this method with proper burning practices over multiple burn sessions.
Understanding the Candle Memory Ring and Proper Candle Burning Techniques
The candle memory ring is the invisible boundary set by your candle's first full melt pool. Once wax melts completely across the jar's diameter, it "remembers" that full-width burn pattern. Future burns will naturally follow that wider path, preventing tunneling before it starts.
This is why the first burn is critical. Light your candle and let it burn until the melt pool reaches all the way to the jar's edges, this typically takes 1-2 hours depending on the candle's size and wick thickness. For a standard 10oz jar candle like Carbondale Candle's Clear Jar 10oz, plan for at least 90 minutes on the first burn (peer-reviewed research).

Wick trimming is equally important for preventing tunneling. Before each burn, trim the wick to about 1/4 inch above the wax surface. A wick that's too long will burn hotter and faster, creating an oversized flame that can scorch the wax unevenly. A wick that's too short won't generate enough heat to reach the jar's edges.
Trim away any mushrooming (the blackened ball that forms on the wick tip). This carbon buildup restricts heat distribution and contributes to tunneling. A clean, properly trimmed wick burns more evenly and produces a fuller melt pool.
Burn time also matters. Aim for 2-4 hour burn sessions when possible (the CDC). Short burns, under 30 minutes, don't give the wax enough time to reach full melt pool. Long burns, over 4 hours, can overheat the jar and damage the wax. The sweet spot is 2-4 hours per session.
How to Prevent Tunneling: The First Burn Matters Most
Prevention is always easier than repair. The first burn sets the stage for your entire candle's lifespan.
Plan for a long first burn. Clear your schedule and light the candle for at least 1-2 hours uninterrupted. This establishes the memory ring at full width. If you can't commit to a long first burn, wait and do it when you have the time. A quick 20-minute test burn will lock in a narrow melt pool that haunts the candle forever.
Trim the wick before every burn. Cut it to 1/4 inch, remove mushroom carbon, and inspect for debris. A clean wick burns evenly and creates a balanced melt pool. Many people skip this step and wonder why their candles tunnel, wick maintenance is non-negotiable.
Avoid drafts. Keep candles away from fans, open windows, and air vents. Even subtle air movement cools one side of the melt pool faster than the other, creating uneven burn patterns. A still room produces the most even burn.
Choose quality candles from the start. Hand-poured candles from makers like Carbondale Candle use properly sized wicks matched to jar dimensions and wax formulations engineered to flow evenly. Mass-produced candles often cut corners on wick sizing, making tunneling nearly inevitable. Investing in a well-made candle prevents frustration down the line.
Burn candles completely before relighting. If you must extinguish a candle before the melt pool reaches the edges, at least let it cool fully before relighting. Never relight a candle with a partial melt pool, you'll only deepen the existing tunnel.
How to Reuse Candle Jars After Tunneling
Once a candle has tunneled beyond repair and burned down, don't toss the jar. The glass container still has value.
Remove any remaining wax by carefully scraping it out with a butter knife or wooden spoon. For stubborn wax, place the jar in a warm water bath for a few minutes to soften it, then scrape again. Wipe the inside clean with a dry cloth.
Wash the jar with warm soapy water to remove wax residue and any soot buildup on the walls. Dry it completely before reusing. The jar is now ready for a second life.
Reuse options:
- Refill it with a fresh candle from Carbondale Candle. The 10oz Frosted Jar Candle offers premium hand-poured wax in a range of scents, perfect for giving a tunneled jar new purpose.
- Use it as a storage container for small items: jewelry, buttons, office supplies, or craft materials.
- Plant a small succulent or herb in it for a decorative desk accent.
- Fill it with dried flowers, coffee beans, or potpourri for a decorative room freshener.
- Use it as a votive holder for tea lights or smaller candles.
Glass jars are durable and reusable. Even a tunneled candle's container deserves a second chance. Many people find that refilling with a quality candle from a maker like Carbondale Candle, where proper wick sizing and wax formulation prevent tunneling, solves the problem entirely for future burns.

Candle tunneling is frustrating, but it's entirely preventable with the right approach. The aluminum foil method, heat gun technique, and hair dryer approach all work to fix existing tunneling, but the real victory is preventing it from starting. Commit to a full first burn, trim your wick before each use, and choose candles from makers who understand wax science.
If you're tired of wasting money on candles that tunnel, start with quality. Carbondale Candle's hand-poured candles are designed with proper wick sizing and premium wax formulations that burn evenly from first light to last. Get lit with us and experience the difference a well-made candle makes.
Frequently Asked Questions
Can you fix a tunneled candle?
Yes, you can fix candle tunneling using several methods. The aluminum foil trick, heat gun, and hair dryer approach all work to remelt the wax pool and create an even surface. The key is ensuring the melt pool spreads across the full diameter of the candle. However, prevention through proper first burns is more effective than fixing tunneling after it occurs.
Why does my candle only burn down the middle?
Candles burn down the middle when the wick burns hotter than the surrounding wax, creating a tunnel instead of a full melt pool. This happens due to improper first burns, wick trimming neglect, drafts, or low-quality wax. The candle memory ring forms on the first burn, so if you don't allow a full melt pool initially, the candle will tunnel for its entire life.
How do I stop a candle from tunneling?
Prevent tunneling by allowing a full melt pool on the first burn (typically 2-4 hours for a standard 10oz jar candle), trimming the wick to 1/4 inch before each burn, keeping the candle away from drafts, and avoiding burning for less than 2 hours at a time. Proper candle burning techniques from the start eliminate tunneling before it starts.
Is it safe to burn a candle that has tunneled?
Burning a tunneled candle is generally safe, but it wastes wax and may produce excess soot from the exposed wick burning hotter. The tunnel can worsen over time, and you'll lose significant wax residue along the jar walls. Fix the tunneling or stop burning the candle to prevent further waste and potential fire safety concerns from an overly exposed flame.
This article was written using GrandRanker