
Table of Contents
- What Is Candle Tunneling and Why Does It Happen?
- How Long to Burn a Candle for the First Time
- How to Fix Candle Tunneling with Foil
- Other Ways to Fix an Uneven Wax Pool
- Wax Type Matters: Paraffin, Soy, and Beeswax Fixes
- Proper Candle Maintenance Tips to Prevent Tunneling
- When Tunneling Means a Candle Defect
- Conclusion: Enjoy an Even Burn Every Time
- Frequently Asked Questions
Last Updated: September 5, 2026
What Is Candle Tunneling and Why Does It Happen?
Candle tunneling is the process where a candle burns straight down the middle, leaving a thick ring of unmelted wax clinging to the sides of the jar. This happens when the flame never gets hot enough to melt the wax all the way to the vessel's edge, creating what many candle lovers call a "memory ring." Once that ring forms, the candle is essentially stuck in a narrow burn radius, and the wasted wax on the sides will never melt.
The root cause is almost always the first burn. If you snuff out a candle before the entire top layer turns to liquid, the wax develops a memory of that smaller pool. Every subsequent burn follows the same narrow path, and the tunneling gets deeper with each lighting. Drafts, wicks that are too short, and candles that are simply under-wicked for their diameter can also contribute to uneven heat distribution.
At Carbondale Candle, we hand-pour every jar with wicks sized to the vessel, but even the best-made candle will tunnel if it isn't given a proper first burn. The good news is that most tunneling can be fixed at home, and the rest can be prevented entirely with a few simple habits.
How Long to Burn a Candle for the First Time
The first burn is the single most important moment in a candle's life. You need to let it burn until the entire wax surface becomes a liquid melt pool that reaches the edges of the jar. For most standard jar candles, this takes about two to four hours, depending on the vessel diameter.
A common mistake is assuming one hour is enough. It rarely is. The wax needs time to warm evenly from the center outward, and if you rush it, you'll lock in that tunneling pattern before the candle has a chance to perform. The goal is a full, even burn across the top, not just a puddle around the wick.
For larger candles with a wider vessel diameter, expect closer to four hours. If you don't have that kind of time, it's better to wait for a day when you do than to light the candle and snuff it early. One patient first burn prevents weeks of frustration.
How to Fix Candle Tunneling with Foil
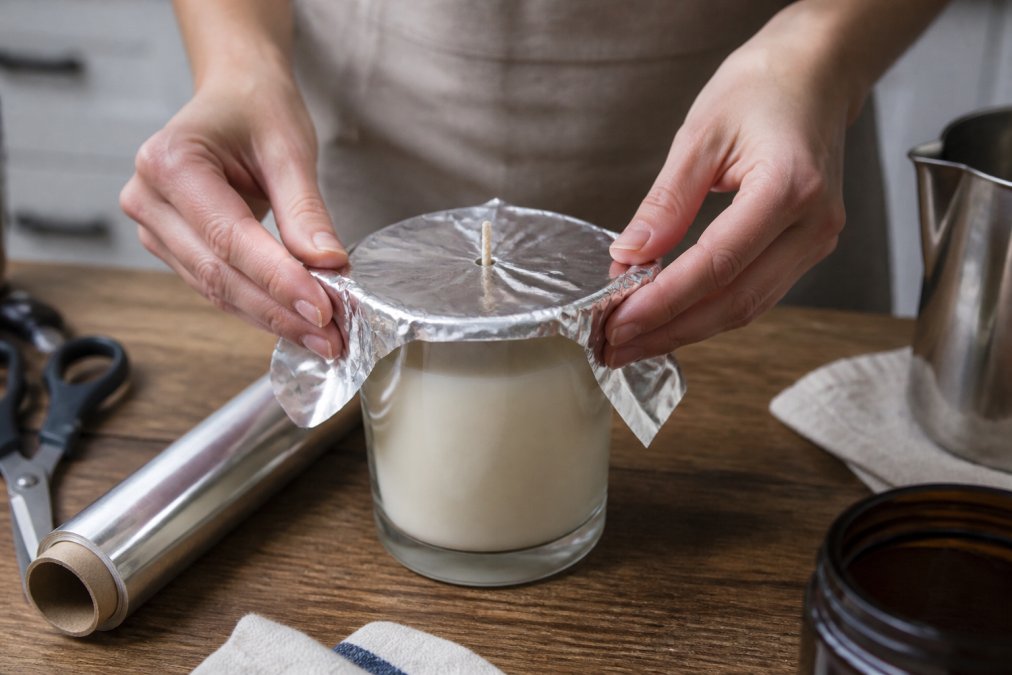
The foil method is the most reliable DIY fix for a candle that has already started tunneling. It works by trapping heat and reflecting it back down onto the wax surface, softening the hardened edges so they can join the melt pool.
- Extinguish the candle and let it cool to room temperature.
- Cut a sheet of aluminum foil large enough to wrap around the jar's rim.
- Fold the foil over the top edge, leaving the wick exposed through a small opening in the center.
- Tear or cut a hole about the size of a quarter in the middle of the foil tent.
- Light the wick and let the candle burn for one to two hours.
- Remove the foil carefully once the entire top layer has melted evenly.
- Snuff the flame and allow the wax to reset before the next burn.
The foil should act like a tent, not a tight lid. You want air to reach the flame, so leave the center hole open and avoid pressing the foil down onto the wax. Watch the candle at all times while the foil is in place, and never leave it burning unattended.
Other Ways to Fix an Uneven Wax Pool
The foil trick is the go-to method, but it isn't the only way to rescue a tunneled candle. If the tunneling is shallow, you can sometimes correct it simply by giving the candle a longer, uninterrupted burn of three to four hours so the heat has time to catch up to the wax walls.
Another approach is to use a heat source to manually melt the raised edges before lighting the wick. This softens the wax memory ring so the candle can start fresh on its next burn. You can also gently scoop out some of the excess wax if the tunnel is very deep, which reduces the distance the flame has to melt through.
For candles with a narrow tunnel and a thick wax wall, some people tilt the jar slightly during a burn to direct the flame toward the un melted side. This is a temporary fix and needs constant attention, so it works best for candles that are close to being even rather than badly tunneled.

Using a Hair Dryer or Heat Gun Safely
A hair dryer or heat gun can melt the raised edges of a tunneled candle, but this method demands caution. Set the tool to low or medium heat and aim it at the wax walls, not the wick or the glass. Keep the nozzle moving so you don't overheat one spot, and stop as soon as the wax softens and pools toward the center.
Never use an open flame or place the candle near a heat source that could crack the glass (nfpa.org). Hot wax can cause serious burns, and overheated jars can shatter, especially if they are made of thin glass. If you try this method, set the candle on a heat-safe surface and let the wax cool completely before lighting the wick.
Wax Type Matters: Paraffin, Soy, and Beeswax Fixes
Different waxes respond to tunneling in different ways, and the fix that works for one candle may not work for another. Paraffin wax has a lower melting point and tends to create a faster, wider melt pool, which makes it more forgiving if you skip a proper first burn. Soy wax burns cooler and slower, so it is more prone to tunneling and needs that full initial melt more than any other type (PubMed).
Beeswax has a higher melting point and burns very hot, which usually helps it reach the edges of the jar. However, beeswax can be brittle, and if the wick is too small for the vessel, it will tunnel just like any other candle. For soy candles, the foil method works well because the trapped heat helps the cool-burning wax catch up. For paraffin, a longer burn time often fixes shallow tunneling without any extra tools.
The wax type also affects how long you should burn the candle on that critical first session. Soy wax needs the full two to four hours, while paraffin may even out in closer to two. Knowing what you are burning helps you set the right expectations and pick the right fix.
Proper Candle Maintenance Tips to Prevent Tunneling
Prevention is far easier than correction. The most important habit is always giving a new candle a full first burn until the melt pool reaches the jar's edges. This sets the wax memory correctly and prevents tunneling from ever starting.
Beyond the first burn, wick trimming is essential. A wick that is too long creates a tall, sooty flame that burns unevenly, while a wick that is too short struggles to produce enough heat. Trim the wick to about a quarter of an inch before every burn, and always center the wick while the wax is still soft after extinguishing (cpsc.gov).
Keep candles away from drafts, which can cause the flame to flicker and burn unevenly, and avoid burning for more than four hours at a time. Excessively long burns can cause the jar to overheat and the wick to mushroom, which leads to soot and an uneven wax pool. A little routine care goes a long way toward an even burn every time.
When Tunneling Means a Candle Defect
Sometimes tunneling is not your fault. If you have followed proper first burn guidelines, trimmed the wick, and avoided drafts, but the candle still tunnels, the issue may be that the candle is under-wicked. This means the wick is too small for the vessel diameter, so it physically cannot produce enough heat to melt the outer wax.
Most reputable candle makers size their wicks to the specific jar, but manufacturing defects do happen. If a candle tunnels on every burn despite your best efforts, the wax may have an issue, or the wick may have been placed off-center during pouring. In these cases, no amount of foil or heat gun work will fully fix the problem.
If you suspect a defect, stop trying to force the candle and contact the maker. Many small-batch producers will replace a defective candle if you explain the issue. A candle that tunnels because of poor wicking is not a reflection of your burning habits, and you shouldn't waste time fighting a losing battle.
Conclusion: Enjoy an Even Burn Every Time
Candle tunneling is frustrating, but it is almost always preventable with a patient first burn and routine maintenance. When it does happen, the foil method and a few careful heat-based fixes can rescue most candles and restore an even, full melt pool.
The key is understanding that your candle's wax memory is set in those first few hours. Give it the time it needs, trim the wick, keep it out of drafts, and you will enjoy a clean, even burn down to the last drop. At Carbondale Candle, we design our hand-poured jar candles to burn evenly from start to finish, and we encourage every customer to follow these simple steps to get the most out of each one.

Frequently Asked Questions
How do I get my candle to burn evenly?
To get an even burn, let the candle melt across the entire surface during its first burn. This usually takes 2 to 4 hours for standard jar candles. Keep the candle away from drafts and trim the wick to about 1/4 inch before each lighting. If tunneling has already started, try the foil method to even out the wax pool before the next full burn.
What is the 3-hour rule for candles?
The 3-hour rule is a general safety guideline that suggests you should not burn a candle for more than 3 to 4 hours at a time. Burning longer can cause the wick to mushroom, create excess soot, and overheat the glass jar. For tunneling, the goal is to burn long enough to melt the top wax surface completely, which can take up to 4 hours for larger jars.
Why does my candle only burn down the middle?
A candle burns down the middle when the wick is too small for the vessel diameter, a condition called under-wicking, or when the first burn was too short. A short first burn creates a 'memory ring' of hard wax that prevents the melt pool from reaching the edges later. The wax 'remembers' the small burn radius and continues tunneling on subsequent burns.
Does trimming the wick help prevent tunneling?
Yes, proper wick trimming is part of good candle maintenance. Trim the wick to about 1/4 inch before every burn. A wick that is too long creates a tall, smoky flame that generates heat above the wax rather than into it, which can contribute to a smaller melt pool. A clean, short wick promotes better heat distribution across the wax surface.
For those who want a candle that performs as beautifully as it smells, explore our hand-poured scented jar candles and experience the difference that proper wicking and quality wax make. Get started with Carbondale Candle and enjoy an even burn every time.
This article was written using GrandRanker